Managing Organizations
Within the Research Workspace (RW), an organization is an entity, such as a university or research institute, of affiliated researchers, projects, and research programs. Invited members to organizations can share their project data and assign read-only or read-write access permissions for collaborators to view or interact with the shared information.
Create a New Organization
Follow these steps to create a new organization that is composed of multiple projects shared among its members:
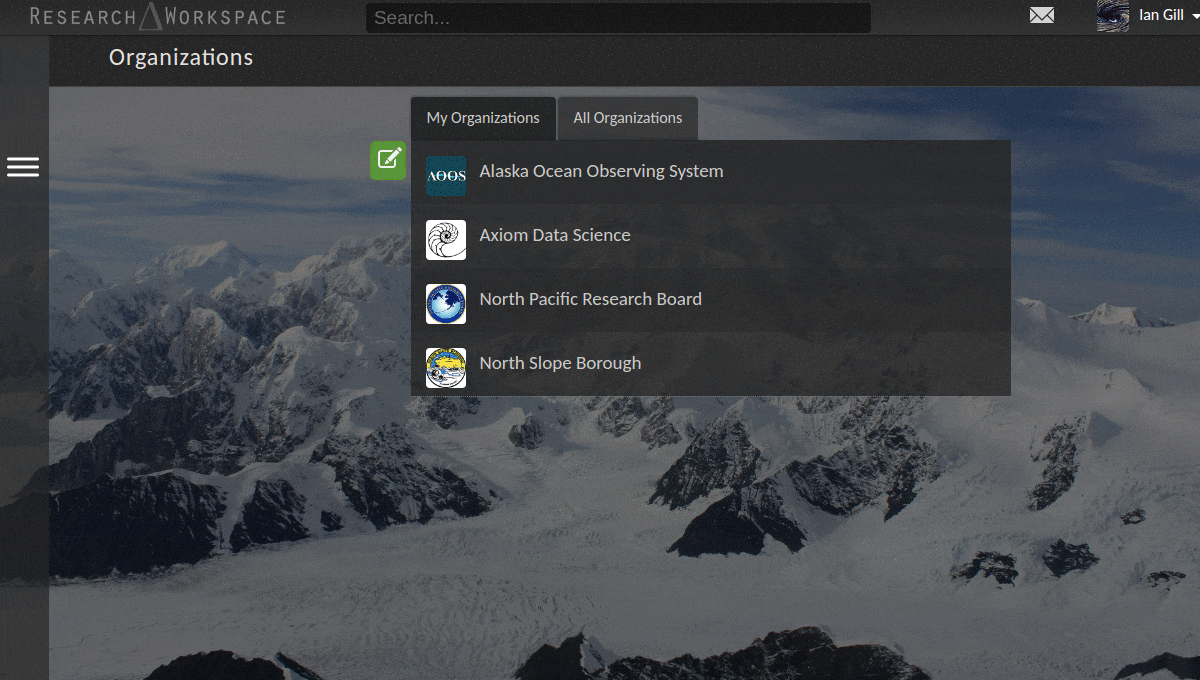
- Navigate to the organization view by clicking the feed icon
 on the left hand side of the window and selecting
 Organizations. - Select the green icon
 to make a new organization.
 - Type in a name for the organization.
Refer to Organization Settings on how to set-up sharing and collaboration settings for the organization.
Note
If you’re creating a new organization in the RW, you may want to establish data management policies for that organization right away. For more information on how data management planning, please see Axiom Data Science’s Best Practices for Data Management.
Add an Organization Logo
To add your organization’s logo to your page, follow these steps:
- Navigate to the organization view by clicking the feed icon on the left hand side of the window and selecting
Organizations. - Select your organization’s name.
- Select
Settingsin the organization view beneath the organization name. - Select the profile icon
 to the right side of your organization name.
 - Browse for your logo image on your computer and select
Open. - Select
Change picture, then browse for your logo image on your computer. - Click
Opento load your image into your RW organization profile. - Use the crop feature to crop your photo into a square and center your image.
- Select
Saveto save your changes.
Organization Metadata
Organization-level metadata describes the organization itself. This is in contrast to more specific types of metadata that might describe a campaign, project, folder, or file. The organization metadata content includes contact information for key members and contains references to associated research projects.
To edit your organization metadata, follow these steps:
- From the organization view, click on your project listing.
- Click on the white down arrow
 next to
 Settings. - Select
View campaign metadatafrom the dropdown list. - The metadata editor will launch, displaying your campaign metadata.
Note
Refer to the metadata editor documentation for more information.
Organization Settings
The organization settings can be managed by selecting Settings in the organization view beneath the organization name. You are only able to make changes to organization settings for which you are the owner. Organization members cannot make changes to the organization settings.
Rename an Organization
To rename an organization, follow these steps:
- Select
Settingsin the organization view beneath the organization name. - Click inside the
Nametext box. - Type in your edits and click
Save.
To assign an acronym for your organization, follow these steps:
- Select
Settingsin the organization view beneath the organization name. - Click inside the organization
Abbreviationtext box. - Type in the acronym for your organization and click
Save.
Organization Members
You can add members to your organization and assign their access permission. Using access permissions, you can grant the organization collaborators read-only or read-write access. There can be multiples of each member type assigned to an organization (e.g., an organization can have more than one owner and members):
 Owners can grant access permissions for the organization and control all of the campaign settings.
 Members can view all project contents within a organization, including files and metadata, but don’t have control of the campaign permissions.
 Viewers can view the organizations projects, files, and metadata, but cannot contribute to the project.
To set the organization’s member permissions, follow these steps:
- Select
Settingsin the organization view beneath the project name. - In the
Membersoption box, clickFind a Person. - Type the name of the RW user.
- Find the person in the user list that appears.
- Click the appropriate icon to assign permissions to that person, either as an owner or member.
- Hit the green
Closebutton.
The user will then receive an invite notification. They will be able to view the organization immediately.
Editing Member Permissions
To edit the organization’s member permissions:
- Select
Settingsin the organization view beneath the project name. - In the
Membersoption box, find the name of RW user for which permission will be changed. - Click the appropriate icon to change permissions for that user. To entirely remove membership access, click the
Removeicon.
Tip
You are not allowed to remove owner permissions for yourself. All organizations must have at least one person who can edit the project.
Manage Member Roles
Each member of an organization is assigned a role that indicates how they can interact with the organization: owner, contributor, or viewer. Member roles can be viewed or reassigned by organization owners under as described above.
| Member can: | Owner | Contributor | Viewer |
| See the organization in their project list | ✓ | ✓ | ✓ |
| See the organization’s contents | ✓ | ✓ | ✓ |
| Add or remove files | ✓ | ✓ | |
| Edit the organization’s metadata | ✓ | ✓ | |
| Add or remove organization members | ✓ | ||
| Assign or change member roles | ✓ | ||
| Associate an organization with a project to campaigns | ✓ | ||
| Delete the organization and all its contents | ✓ |
Note
When viewing a campaign, you can see your member status in the top right corner of the window, just under your name.
Inviting a New Workspace User to an Organization
New users can be added to the Workspace from any project, campaign, or organization. The instructions below describe how to invite a new member to a project who is not already a Workspace user.
To add a new member to the Workspace, follow these steps and review the video below:
- Click on the feed icon on the left-hand side of the window and select
Organization. - Click on the name of your campaign.
- Select
Settingsnear the top of the page, just under the organization title. - First, check to ensure the person is not already an RW member. Use the
Find a persondialog to search for existing RW members. If their name does not appear, then they are not a current RW member. - To add a new member, click the
+to the right of the “Find a person” search box. - In the “Add Members” page click the email icon
 in the upper right.
 - Enter the email address for the new member you want to invite. More than one member can be invited by entering additional email addresses each on a new line.
- Beneath the email dialogue box, select the role you would like to assign to the new member (see Manage Member Roles for more information).
- You can preview the invite email that will be sent by clicking
Preview invitation. - Click
Send.
Note
Once you have invited a new member, that person must create a Workspace account to join the project. The account should be created using the same email address used for the invitation, otherwise they will not have access to the project. New users can enter the access code “workspace2017” if prompted.
Delete an Organization
If you are the owner of an organization, you can delete it by following these steps:
- Click on the white down arrow next to
Settings. - Select
Delete organizationfrom the dropdown list. - Confirm that you want to delete the organization by selecting
Deletein the popup window that appears.
Warning
Deleting an organization will remove the project as well as all its files and any metadata. There is no going back, so be sure that you want to take this action!